The recent release of TiddlyWiki v2.5 included something rather exciting for me: jQuery, the popular Javascript library is now part of the TiddlyWiki core.
![]()
This is exciting for a number of reasons.
- The TiddlyWiki core functions can now use jQuery to perform all manner of DOM inspection and DOM manipulation. We can refactor a ton of code to benefit from jQuery's blistering Sizzle engine and pass the burden of maintaining lots of utility functions over to those clever jQuery bods. All of which will simplify the TiddlyWiki codebase and ultimately make it easier to read and easier to maintain.
- TiddlyWiki plugin developers will now be able to make use of jQuery in their plugins. That's great news for both hardcore plugin developers and people dabbling for the first time. jQuery is elegantly expressive, powerful, and superbly documented. All of this lowers the barriers to entry for a would be developer and smooths the way for exisiting developers.
- There is a huge wealth of jQuery plugins which can now be utilised by TiddlyWiki. The quality of many of these plugins is tremendously high. Bring 'em on!
But how does a TiddlyWiki plugin developer get started? How can we bring a jQuery plugin into TiddlyWiki and make it available via a Macro? Let's take a look at an example.
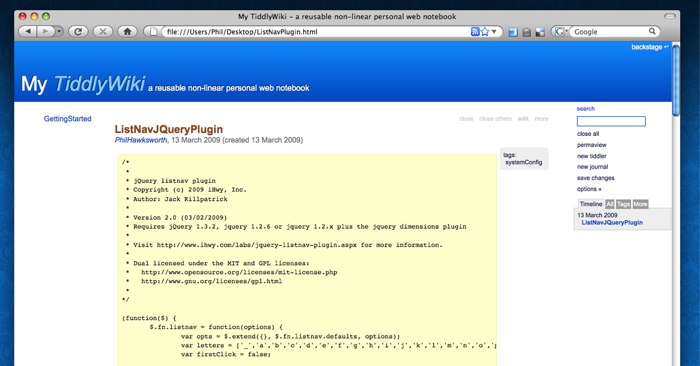
Fred, my colleague at Osmosoft stumbled upon a plugin which creates a nice navigation structure from an HTML List element. The plugin has lots of examples and documentation and seemed like a good contender for bringing something useful into TiddlyWiki.
To include the plugin, all we need to do is copy it into a tiddler and then tag the tiddler with systemConfig. After saving the file and reloading, the plugin is available for us to use.
With the jQuery plugin availble, we can use it to provide a snazzy UI for any UL or LI elements on the page. The Javascript syntax for that is nice and simple:
    // Turn the list element with an ID of 'myList' into a funky ListNav
    $('#myList').listnav();
This is great, but we want people to be able to call this from TiddlyWiki without having to write Javascript. If we create a TiddlyWiki macro to call this for us, people can easily make a nice NavList anywhere. Let's make a macro which turns the contents of a tiddler into a NavList like this:
>
To make that available, we should create a TiddlyWiki plugin which delivers this macro. We do this in a new tiddler. I created a tiddler called 'ListNavPlugin' and once again tagged it with systemConfig so that it becomes code that TiddlyWiki knows to interpret. To start with, let's just create the macro and ensure that we can invoke it.
// create macro object
config.macros.listnav = {
// Add a handler function to be invoked by >
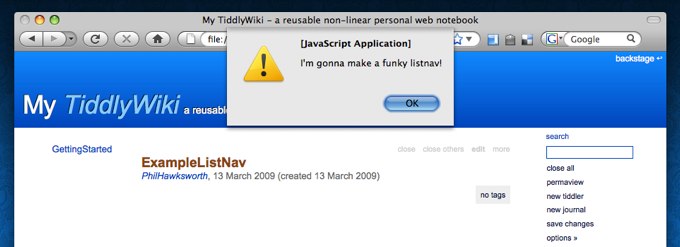
handler: function(place, macroName, params, wikifier, paramString, tiddler) {
// do some magic...
alert("I'm gonna make a funky listnav!");
}
};
To see it working, I created two more new tiddlers. MyFruityList holds a list of items, and ExampleListNav holds a call to the new macro.
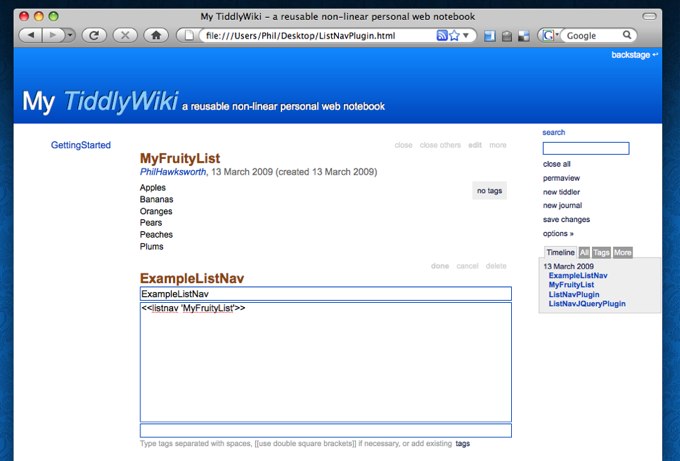
Saving the TiddlyWiki file and reloading will make the macro available to call. If we open the ExampleListNav tiddler, we should see our macro called like this:
All good, but not exciting yet. Let's flesh out our TiddlyWiki macro a bit. We'll use a TiddlyWiki function to get the text from our desired tiddler and then make a list from it. Where we might once have used some TiddlyWiki utility functions to help us create the HTML elements (like createTiddlyElement), we can now use jQuery's helper functions to append elements to the document.
// create macro object
 config.macros.listnav = {

   // Add a handler function to be invoked by >
   handler: function(place, macroName, params, wikifier, paramString, tiddler) {

     // target tiddler passed in as macro parameter
     var title = params[0];

     // read list items from tiddler contents
     var text = store.getTiddlerText(title);
     if(text) {

       // generate list
       var items = text.split('\n');
       var list = jQuery('<ul></ul>').attr('id', 'listnav').appendTo(place);
       jQuery.each(items, function(i, itm) {
         jQuery('<li>').text(itm).appendTo(list);
       });

     }
   }
 };
Now we're getting somewhere. We've grabbed each line from our MyFruityList tiddler and used jQuery to turn them into an unordered list.
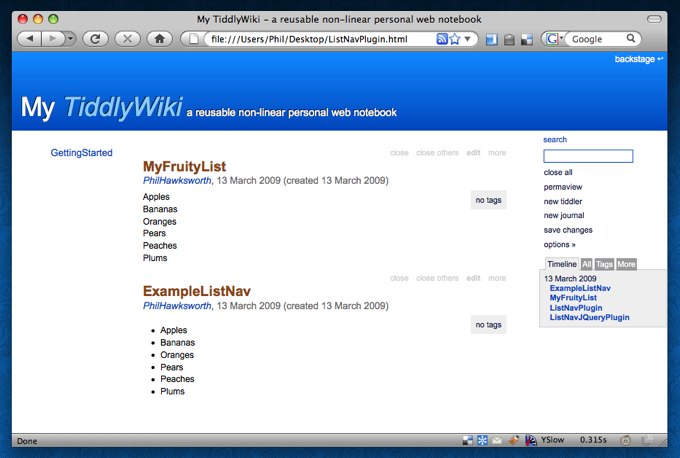
We can now call the jQuery plugin to render our list as a NavList. The plugin requires a little extra HTML so we can create that, and then call the listnav plugin.
// create macro object
config.macros.listnav = {

    // Add a handler function to be invoked by >
    handler: function(place, macroName, params, wikifier, paramString, tiddler) {

        // target tiddler passed in as macro parameter
        var title = params[0];

        // read list items from tiddler contents
        var text = store.getTiddlerText(title);
        if(text) {
            // generate nav bar
            jQuery('<p />').attr('id', 'listnav-nav').appendTo(place);

            // generate list
            var items = text.split('\n');
            var list = jQuery('<ul></ul>').attr('id', 'listnav').appendTo(place);
            jQuery.each(items, function(i, itm) {
             jQuery('</li><li>').text(itm).appendTo(list);
            });

            // apply listnav
            list.listnav();
        }
    }
};
When we save our plugin, reload the page and open up our ExampleListNav tiddler, we see the navlist. Cool! Hang on though, it looks a bit rubbish. Not like the examples we saw earlier. We have to include the CSS to style our new navlist. Easy enough, let's use our TiddlyWiki plugin to create a sylesheet for our new HTML by adding this:
      // add default styles (adapted from http://www.ihwy.com/labs/downloads/jquery-listnav/2.0/listnav.css)
   config.shadowTiddlers.StyleSheetListNav = '  \n' +
   '#listnav-nav { margin: 20px 0 10px; }\n' +
   '.ln-letters { overflow: hidden; }\n' +
   '.ln-letters a { font-size: 0.9em; display: block; float: left; padding: 2px 6px; border: 1px solid #eee; border-right: none; text-decoration: none; }\n'+
   '.ln-letters a.ln-last { border-right: 1px solid #eee; }\n' +
   '.ln-letters a:hover, .ln-letters a.ln-selected { background-color: #eaeaea; }\n' +
   '.ln-letters a.ln-disabled { color: #ccc; }\n' +
   '.ln-letter-count { text-align: center; font-size: 0.8em; line-height: 1; margin-bottom: 3px; color: #336699; }';
   store.addNotification('StyleSheetListNav', refreshStyles);
And we're done. The jQuery plugin is turning our boring old list into a dynamic indexed list with navigation. Cool! For extra credit, we can make our jQuery a little more concise. Notice that we call jQuery by name rather than with the common idiom of $. We could simply replace each jQuery with $ in our code and that would work, but beware! There are other Javascript libraries that use the $ shortcut. we don't want to introduce the possibility of a clash. Luckily, there is a simple way to get around that. All we need to do is wrap our TiddlyWiki plugin in a closure and pass jQuery in as an argument (as explained on the jQuery documentation site). Then we can use whatever shortcut for jQuery in our code that we like. The final code looks like this:
(function($) { // set up alias

   // create macro object
   config.macros.listnav = {

   // Add a handler function to be invoked by >;
   handler: function(place, macroName, params, wikifier, paramString, tiddler) {

     // target tiddler passed in as macro parameter
     var title = params[0];

     // read list items from tiddler contents
     var text = store.getTiddlerText(title);
     if(text) {

      // generate nav bar
      $('<p />').attr('id', 'listnav-nav').appendTo(place);

      // generate list
      var items = text.split('\n');
      var list = $('<ul></ul>').attr('id', 'listnav').appendTo(place);
      $.each(items, function(i, itm) {
        $('</li><li>').text(itm).appendTo(list);
      });

      // apply listnav
      list.listnav();
     }
   }
 };

   // add default styles (adapted from <a href="http://www.ihwy.com/labs/downloads/jquery-listnav/2.0/listnav.css)">http://www.ihwy.com/labs/downloads/jquery-listnav/2.0/listnav.css)</a>
   config.shadowTiddlers.StyleSheetListNav = "\n" +
   "#listnav-nav { margin: 20px 0 10px; }\n" +
   ".ln-letters { overflow: hidden; }\n" +
   ".ln-letters a { font-size: 0.9em; display: block; float: left; padding: 2px 6px; border: 1px solid #eee; border-right: none; text-decoration: none; }\n"+
   ".ln-letters a.ln-last { border-right: 1px solid #eee; }\n" +
   ".ln-letters a:hover, .ln-letters a.ln-selected { background-color: #eaeaea; }\n" +
   ".ln-letters a.ln-disabled { color: #ccc; }\n" +
   ".ln-letter-count { text-align: center; font-size: 0.8em; line-height: 1; margin-bottom: 3px; color: #336699; }";
   store.addNotification("StyleSheetListNav", refreshStyles);

 })(jQuery);
You can explore the finished example in a TiddlyWiki.